More than 75 million websites rely on the Open Source CMS WordPress to run their website. The power behind this giant community is incredible. Your WordPress website has unlimited potential, unlimited opportunities and can serve as the platform for your financial freedom.
WordPress runs well right out of the box, however, if you truly want to take advantage of the power that WordPress encapsulates, be sure to incorporate these ideas, strategies, changes, and improvements to your website.
1) Update Your WordPress Core
WordPress is constantly updating their software. Aside from the many enhancements and features they release, they do their best to help defend your website against vicious attacks.
Updating your website is easy, often just pressing a button. The files are downloaded and updated in the background.
Before you update WordPress, be sure to update your website, including the database and all the files. Depending on your web host, it’s often easy to do this. Check with your host for their most advisable method. Don’t skip this step.
If everything goes smoothly, you can backup and update WordPress in under 10 minutes.
Note: Check your theme’s compliance to confirm your website will operate properly. Often older, and free theme’s are not properly maintained, and therefore, many issues and problems can arise. If this happens, revert to your latest backup version. You backed up your website, right?
2) Update Your Theme
Often theme creators release updates to their theme that fix bugs, add new features, match current updated WordPress compliance and help to keep your website secure.
Updating your theme is often more complicated and time consuming than updating WordPress, however, it’s equally important.
You will need to keep in touch with the theme builder to stay abreast of theme updates. Some themes will let you in your administration area if an update is available, however, more often than not, you’ll need to go to the source to learn about the updates.
Some of the more savvy theme authors will have an easy-to-use update option. This works similar to a one-click update, similar to updating WordPress.
Other themes require you to follow directions, often requiring you to update all of the theme files, through ftp, or installing the update in your admin area at menu: Appearance > Themes.
Checking Current Version of Your Theme
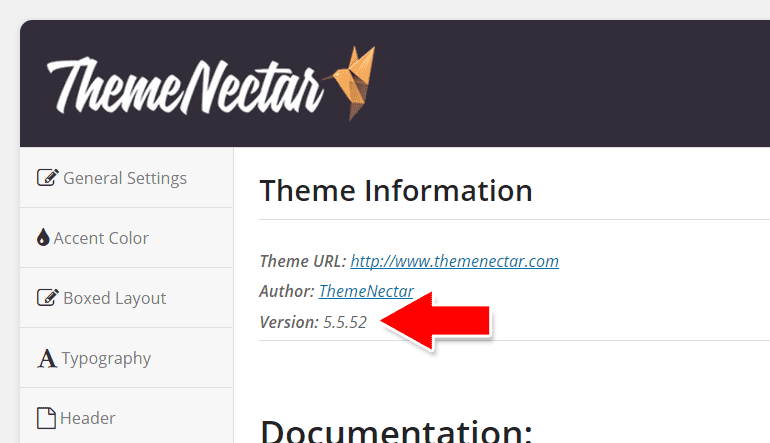
For example, the Salient theme puts the installed theme version on the “Theme Information” page (see below) found in the admin area.
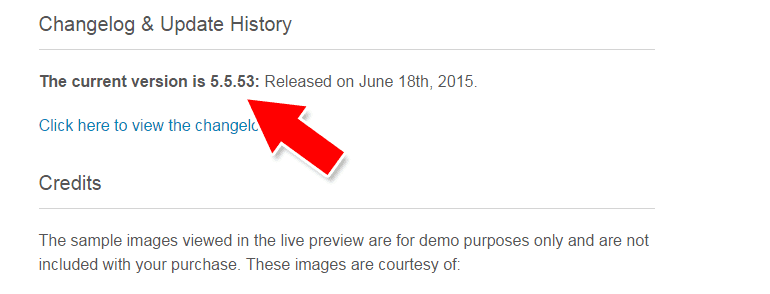
We can view the theme sales page to view the current release version. In this case, an update is available.
3) Update Your Plugins
This incredibly easy step is incredibly important. Just like your theme, plugins need to update their code to keep up with changes. You will be notified when your plugins become outdated.
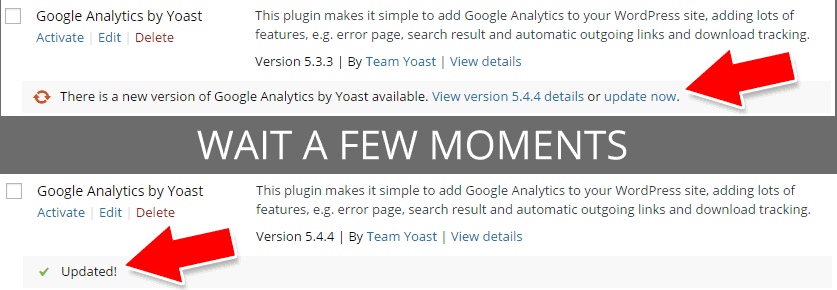
If your plugin is free, it’s often capable of being updated through the WordPress repository. Click on the “update now” text link to update the plugin. The rest is taken care of automatically. You will be notified when this is completed successfully.
Some paid plugins have time limits to their updates. For example, the popular form creation plugin Gravity Forms, provides one year of support and upgrades. To update the plugin past this time requires a renewal (fee) of your subscription.
If you are planning to purchase a plugin, be sure you understand their terms and conditions, and can prepare in advance if you need to pay additional fees.
Other paid plugins provide a lifetime of support and updates. However, unless the plugin has an active community, it may not be properly updated if they are without necessary revenue to support the continual development. Food for thought.
4) Secure Your WordPress Install
The complications of securing a WordPress website in it’s entirety is much greater than a multi-purpose article such as this. I’ll provide you with a few simple tips, but beyond this, I suggest you search out answers to your specific issues you are trying to address.
First, do NOT use “admin” for any account credentials. This is very common, and a go-to for WordPress hacks. You can add admin to a user name if that’s easiest for you to organize the logins, such as “daveadmin”.
Next, choose a complex password. The more complex, the greater the chance your account won’t be hacked. By all means, don’t use “password” or “123456”, the two most common passwords used.
The goal with your password is to make it hard for other people to guess and hard for a brute force attack to succeed. Many automatic password generators are available that can be used to create secure passwords.
— WordPress Team
When choosing plugins to extend the functionality of your website, be very careful which plugins you choose. Poorly written, or improperly maintained plugins can wreak havoc on your website. I suggest you choose popular, active plugins whenever possible. Pay special attention to the information maintained by the WordPress repository, including downloads, feedback and star rating.
The plugins mentioned in this article are all popular, well maintained and have been used by us, often for several years.
Finally, be sure to check the Permission Scheme on your folders after you complete the install. All too often, improper file permissions are left on the folder structure, making it easy for site to be hacked.
Hardening your WordPress website is also very important. WordPress has provided this sophisticated guide to tighten up the security of your website, it’s very comprehensive, so grab a jug of coffee and read about the following topics:
- What is Security?
- Security Themes
- Vulnerabilities on Your Computer
- Vulnerabilities in WordPress
- Web Server Vulnerabilities
- Network Vulnerabilities
- Passwords
- FTP
- File Permissions
- Changing file permissions
- Regarding Automatic Updates
- Database Security
- Securing wp-admin
- Securing wp-includes
- Securing wp-config.php
- Disable File Editing
- Plugins
- Security through obscurity
- Data Backups
- Logging
- Monitoring
Now that’s a long list! Here is another comprehensive guide you may want to consider: WordPress Security: The Ultimate Guide
5) Improve Your Page Speed
You have 2 seconds or less for your website to load before your visitors will leave. You have the same amount of time for Google to ding your website for being too slow (yes, page load time is an important factor in Google’s algorithm)
There are two main ways to improve your page speed: server performance and website performance.
Server performance is easy – don’t use a low-budget shared hosting plan. If you’re paying $2.99 a month I can almost guarantee your website is going to be slow. Period. Your website is ‘shared’ with hundreds or thousands of other websites, all competing for the hardware offered by the server, including the processor (CPU), the hard drives, the RAM (memory), and accessing your database.
When someone loads a page on your website, all the above mentioned resources must be accessed, if they are currently in use, then your website needs to wait in line for them to become available. This can take seconds if not longer.
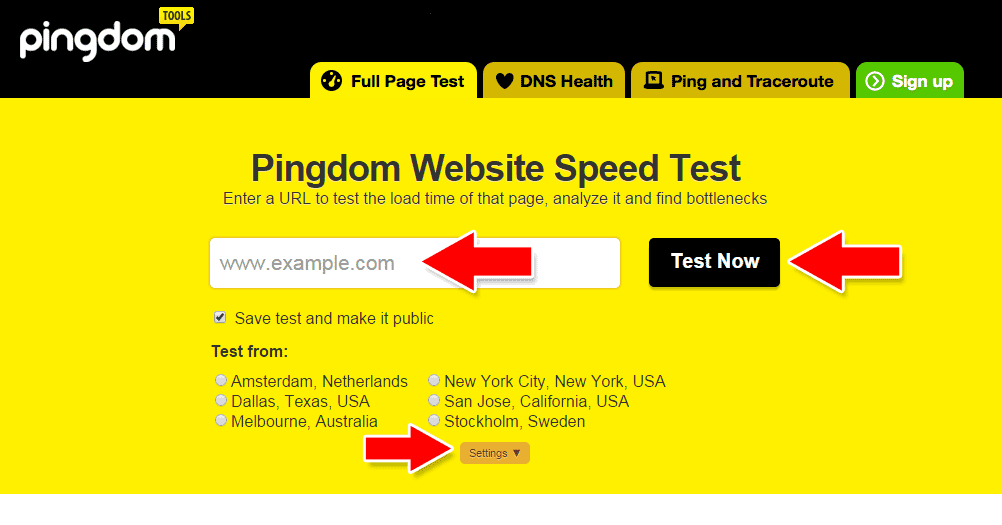
There are two wonderful, free tools to use that will calculate how long your website takes to load and also provide you with a sophisticated look at exactly what aspects (images, css, javascript, etc.) are taking the most time.
Pingdom
Pingdom Website Speed Test allows you to quickly and easily view the time your website takes to load. You can choose different server locations to test your website from. I suggest you choose a server location closest to you (or your server).
After a brief wait, you can view the results of your test. Pay attention to the four items at the top of the page:
- Performance Grade: score out of 100
- # of Requests made: lower is better/faster
- Load Time: Shorter is better. Aim for 2 seconds and under.
- Page Size: Typically I suggest people try to keep their homepage under 1 mb.
If you are interested in looking into the report further, click on the tabs below:
- Waterfall gives you a detail of each request made, including what size each file is, and how long it took to load
- Performance Grade separates your page speed performance into 8 sub-categories allowing you to see where improvements can be made
- Page Analysis segments and categorizes the requests being made. This is a great way to see where you can make page improvements.
- History is as simple as it suggests, view the history of reports ran for your website.
GT METRIX
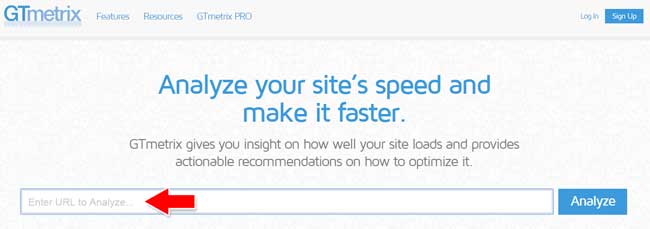
The GT Metrix website does a great job describing their service and their benefits:
GTmetrix tells you a lot about your website performance.
Our Report gives you the full picture on how your site loads and helps you detect where bottlenecks are.Key features include:
- PageSpeed and YSlow scores and Recommendations
- Page Load Details (time, size, number of requests)
- Various Analysis Options
- Waterfall, Video and Report History
The test and report provided by GT Metrix is similar to Pingdom, however, GT gives you valuable PageSpeed and YSlow information as well.
YSlow analyzes web pages and why they’re slow based on Yahoo!’s rules for high performance web sites. Take a moment to view their 34 Web Performance Best Practices and Rules. If you don’t have the time and/or money to follow all of these rules to a T, don’t be dismayed. These are suggestions to help your website run faster. These best practices should be implemented whenever possible, just don’t get overwhelmed with everything their is to do. Take it in bite-size, manageable steps.
The main tabs on the GT Metrix report are:
- PageSpeed
- YSlow
- Waterfall
- Video (only available to GT Metrix users)
- History
Now that you have identified the major page speed / performance problems, you can start addressing those issues as time permits.
Image Compression
Another simple way to improve your page load times, is to compress your images. If you use Photoshop’s “save for web” feature, then you are likely a step ahead of the competition.
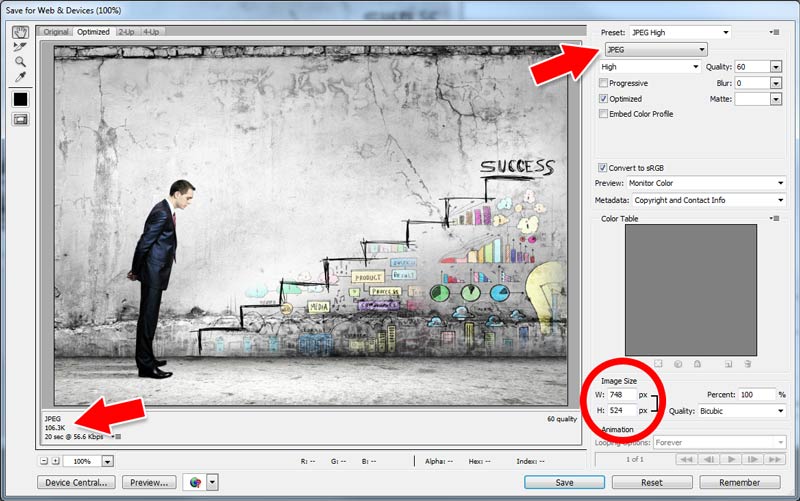
Photoshop is my favorite image compressor, because the dialogue box allows you to change different settings and instantly see how those settings impact the file size.
As you can see from the screenshot, this dialogue window allows you to choose the file format (gif, jpg, png-8, png-24), let’s you see and modify the existing dimensions, and at left, tells you the compressed file size, based on the current settings.
You can also compress images once on your website. I suggest using the free plugin WP Smush. This will reduce the file size of the images already on your website.
Here is a brief video explaining how the plugin WP Smush Pro works.
You can eliminate thousands of wasted bytes by compressing images. Your visitors, especially mobile viewers, will be thankful you did!
Remove Unused Plugins
Going through the WordPress plugin repository can be as exhilarating as a kid in a candy shop. Before you know it, you’ve installed 46 plugins that do everything you could ever imagine, even use WordPress to flush the toilet for your cat. Ok, maybe not that.
What you find out in time, is that you really don’t need all those plugins you once thought you did. They sit around collecting dust, and SLOWING your website down.
It’s time to clean house, and delete the unused, unneeded plugins. All of those unused plugins have digital weight to them, forcing people to download file attachments (typically javascript) for no reason!
To delete your unused plugins just go to the “Installed Plugin” page in your admin area and click on the “deactivate” link text below the plugin name. Once it is deactivated, click on the “delete” text link to delete the plugin entirely.
It probably goes without saying, but be careful not to delete any plugins that are currently being used on your website. If you are unsure, leave the plugin in “deactivated” mode and check the front end of your website for any errors or problems.
6) Improve Your Content
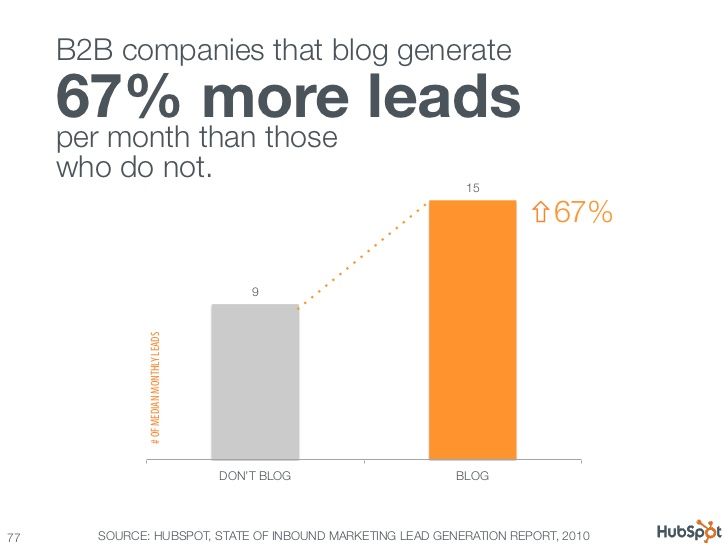
If you haven’t started blogging, then now is likely the best time to start. Statistics about the power and profitability of blogging are everywhere.
Marketing powerhouse HubSpot revealed that B2B companies receive a significant increase in leads through the use of their blog.
On your blog, there are numerous ways to improve your user’s experience. Here are some powerful ones to be aware of.
Use Images. Lots of Images.
Images help to break up the content you are writing. They provide a way to visualize what you are trying to say. They allow you an alternative method to communicate with your reader.
You can purchase images at many places online, several of which are very affordable.
iStock has been my royalty-free image provider for many years. However, they aren’t as affordable as they once were. They have an awesome selection and great tools for finding exactly what you are looking for.
123rf is another good option. You can purchase images here for as little as $1. You purchase credits from 123rf, which range in price depending on the number of credits you buy at a time. You can find images, videos and audio here.
BigStockPhoto has a subscription business model, allowing you to purchase a one-month subscription and download different quantities per month, based on the pricing level you select.
There are dozens of other options out there, like ShutterStock and Photodune. Unsplash is a free stock image site, adding one photo per day. Here are a few other stock image sites to check out:
- Death To The Stock Photo
- Dollar Photo Club
- Gratisography
- Lightstock (Faith based organization with appropriate imagery)
Find the stock image provider that works best for you and dress up those blog posts!
Quality Over Quantity
Many blog owners are tempted to write something quick just to get their blog populated with some content. However, the stats show that quality content is really what pays the best ROI.
To be clear, let me define how I am using Quality and Quantity. Quality has two important factors; length and caliber of the information presented (more below). By quantity, I mean the number of posts being made.
If you are writing 5,000 words total, you may be tempted to have ten 500-word articles (quantity) or more wisely, two 2,500 word articles (quality).
Quality content is more likely to be shared on social channels, and more likely to be linked to, helping your website improve in the search results.
Content quality comes down to these major factors:
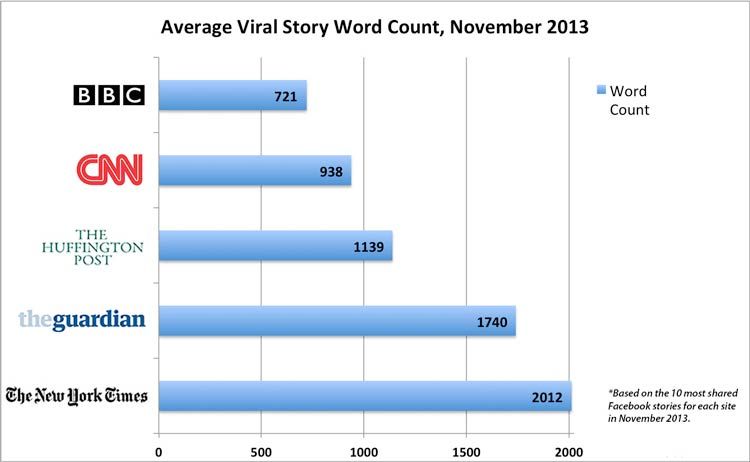
- Word count: I suggest you aim to write articles that are 1,000 words or greater. You’ll want to write content that is better than anything out there, and that’s going to take some effort. Keyword stuffing 450 word articles are a thing of the past.
- Level of detail: Put in the time and effort to properly research and plan out your content. You’ll want to take your reader down a logical, well thought-out path. It should be easy to follow along your ideas and suggestions.
- Readability: Including spelling, grammar, how well the page is designed and how captivating/engaging your content is. Check your readability with this online tool.
7) Make Your Website a Lead Generation Rock Star
Not all websites are the same. Obviously. Set aside from the massive multi-million websites like Amazon, Google, Ebay, Mashable, NY Times and others in the top 100 US websites list. What makes for a valuable small business website? I mean valuable in the truest sense of the word… adds value to your business.
There are several ways to improve the efficacy of your website, which ultimately should increase the revenue of your business. Let’s talk about a few of the most important.
Call to Action
A “call to action” is an activity a website visitor can perform on your website. Take some time to evaluate what calls to action you would like your visitors to take. Here’s a list to get the sparks started:
- Request a quote
- Contact Us (phone, complete form, email)
- Sign up for a newsletter
- Download a [whitepaper, catalog, guide, report, newsletter]
- Sign up for a sample
- Get started
- Buy Now / Purchase a product
- Learn More
- Sign up for a webcast
- View a video
By strategically planning what you would like your visitors to do, you can build your pages accordingly. If you know which actions produce the greatest return, you can prioritize where you place buttons or images that inspire the user to take the action.
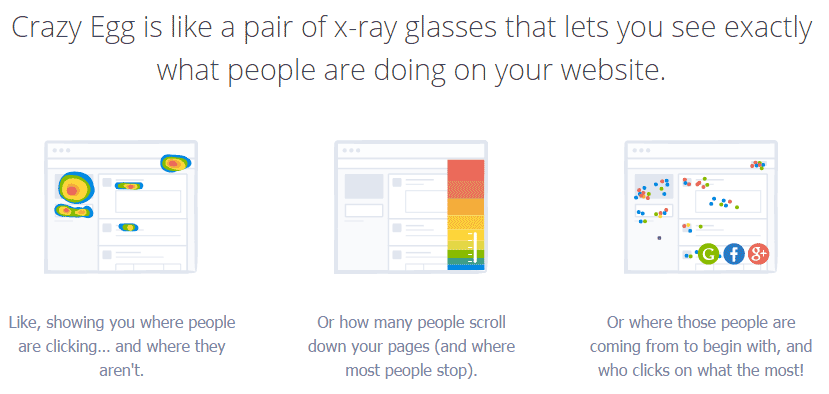
You can use Heat Map software that gives you insights into your visitors clicking patterns.
Test and iterate. Try different button placements. Try different colors. Track all your results. Optimize and improve. Jay Abraham, the master of offline iteration testing, once tried 30 ways to greet customers at his furniture store. The results of his experience created millions of dollars of additional revenue.
Landing pages
According to unbounce:
when discussing landing pages within the realm of marketing and advertising, it’s more common to refer to a landing page as being a standalone web page distinct from your main website that has been designed for a single focused objective.
Landing pages have one purpose in mind, a call to action. If you want your visitor to download a guide for example, then you build one page, with the sole focus and intent for your visitor to download the guide, period.
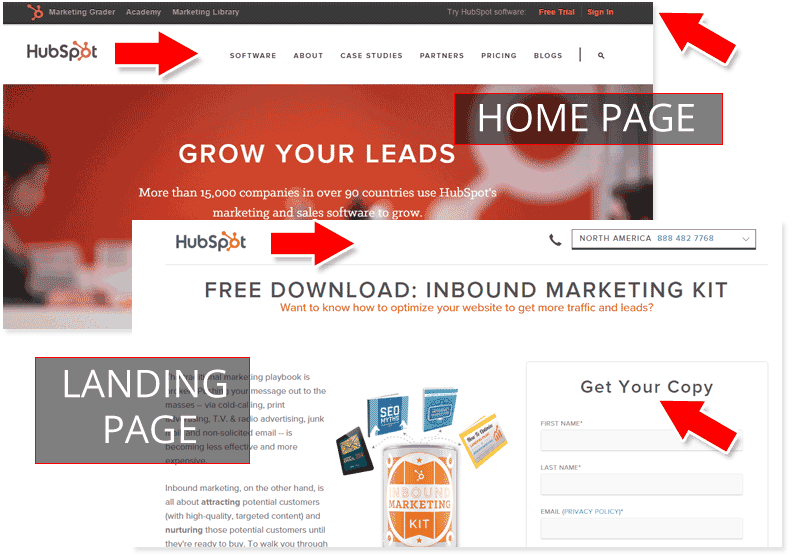
The following image compares two pages from the same website: HubSpot. The top part of the image shows their homepage.
Notice you can see a dark grey navigation strip at the very top, followed by their standard navigation below, next you’ll find their hero image background with with their compelling benefit “GROW YOUR LEADS.” It’s busy, there are several things you can do from this page.
Next, notice their INBOUND MARKETING KIT landing page. The grey navigation strip has been removed. The navigation is nowhere to be found, and there is just one thing you can… complete the form at the right.
Some companies remove all elements from the page, so the user lands on a distraction-free environment. Page element examples are: Menu, sidebar, search bar, footer, copyright bar, and breadcrumbs. Other companies limit the distractions but still provide the visitor with a few different actions to take.
Email Marketing / Newsletter Sign Up
Perhaps the most common call to action is the ability for a visitor to sign up for the website’s newsletter. Also known as email marketing.
Sending out an email newsletter to your subscriber list has tremendous benefits. First, it allows your customers to instantly learn of new products, new offerings, new information, news, updates, and fresh content.
A website with 20,000 subscribers can write a new blog post, send out the newsletter and can expect to have a 25-40% email open rate, that’s 5,000 – 8,000 readers consistently engaging with your business!
Choose not to maintain a newsletter list, and you leave it to Google to find and promote your content through the search engines, you could be waiting for days (if not weeks).
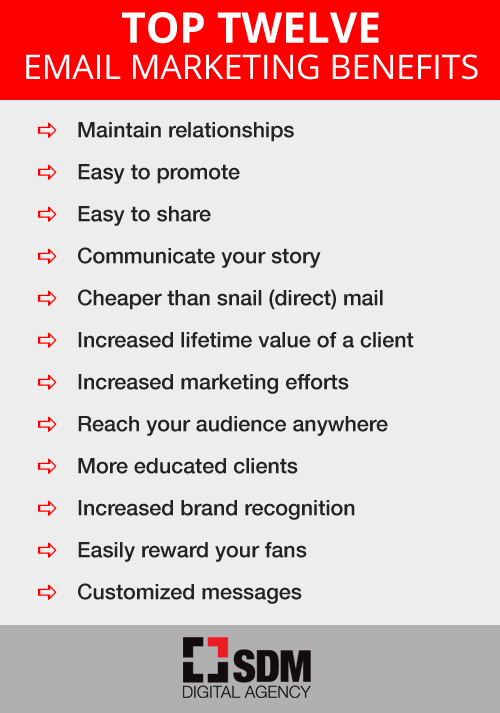
In short, the top benefits of email marketing are:
- maintain relationships
- promotion (content, events, products)
- easy to share
- communicate your story
- cheaper than snail mail
- increase lifetime value of a client
- increase your existing marketing efforts
- reach your audience where ever they are
- more educated clients
- increased brand recognition
- easily reward your fans or loyal customers
- customize the recipients message so they receive exactly what they want
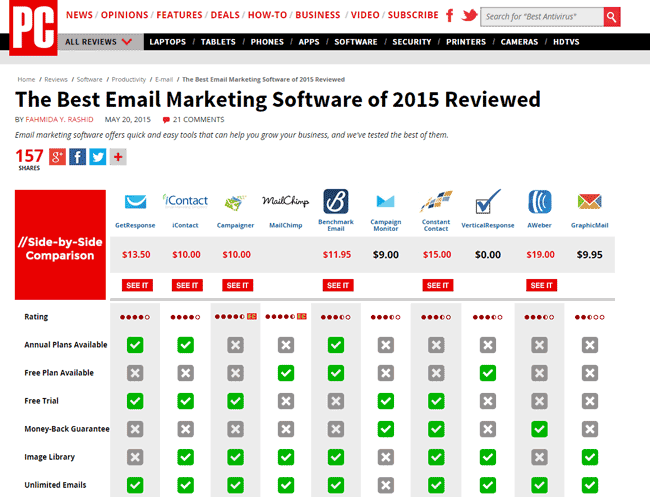
There are several companies that exist to help you maintain subscriber lists and send (better) emails. Pricing is relatively similar, so choose according to the additional services and features they provide.
PC Magazine has compiled a great comparison of the most popular providers to consider.
Most, if not all of the above email marketing software companies will integrate nicely with your WordPress website. It’s possible you’ll need to have a developer help you get everything installed and working properly, but the nominal fees paid will produce tremendous benefits long term!
8) Make Your Website Readable and Enjoyable
We are starting to depart from the technical side of the article, to the more subjective. You won’t find the same stats and absolutes, but user experience is just as important as anything else I’ve mentioned. In fact, you could easily say this entire article is written to enhance the user’s experience.
What makes a website readable and enjoyable?
Write about things that matter. Write about things your readers are already thinking about, or live right next door to what they are thinking about. This requires focus. Know the physchographics of your readers, and deliver value accordingly.
PHYSCHOGRAPHICS (From Wikipedia):
Psychographics is the study of personality, values, opinions, attitudes, interests, and lifestyles. Because this area of research focuses on interests, attitudes, and opinions, psychographic factors are also called IAO variables. Psychographic studies of individuals or communities can be valuable in the fields of marketing, demographics, opinion research, futuring, and social research in general. They can be contrasted with demographic variables (such as age and gender), behavioral variables (such as usage rate or loyalty), and organizational demographics variables (sometimes called firmographic variables), such as industry, number of employees, and functional area.
Look for ways to break up your content with lists, blockquotes, images, headings (<h1>-<h6>), screenshots, internal links, external links, embeds and more.
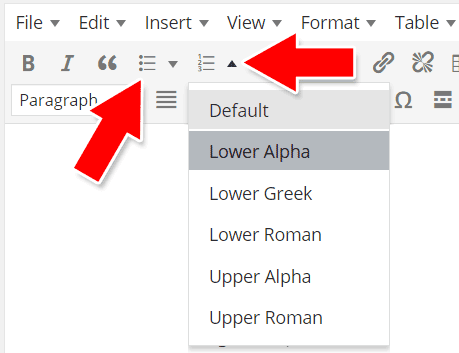
Creating lists in WordPress is very simple. You’ll have two choices if you use the WYSIWYG editor in WordPress.
You can create a “bulleted list” or a “numbered list“. The arrow next to the icon opens up a drop down box with additional choices. Select the text you would like to make into a list, or simply click on the list icon and start typing your list. Try different list settings to find a solution you are pleased with.
This block of text is using the blockquote format. To create a blockquote, simply click on the quotes icon. Your theme’s CSS file will determine what your blockquote will look like. You can modify your blockquote design to accomplish your own unique design.
Placing images within your blog posts are worthy of it’s own unique blog post. In short, use the “Add Media” button to upload and place images. Follow the dialogue box options to achieve your desire, such as size and placement of your image.
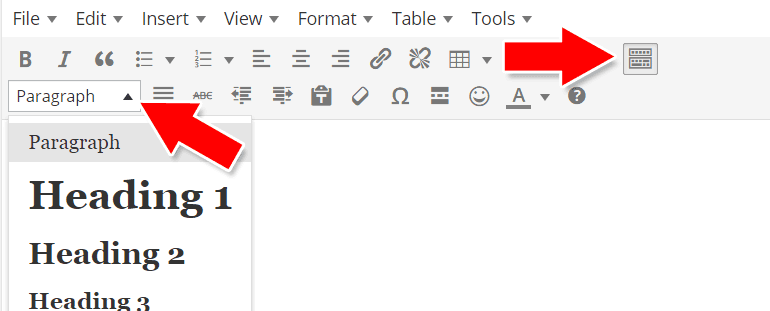
Headings are used to prioritize and break up the elements of your pages or blog posts. I recommend using the Heading 1 (<h1>) tag just once once on a post, and I typically use the Heading 2 or Heading 3. I find little value / benefit to using Heading 4.
Be sure to have the “Toolbar Toggle” clicked to reveal and use the heading dropdown.
9) Rank High on Google with Improved SEO
Google is the king of the search engines. Google’s market share is more than 70% of all search traffic (market share varies by country and device). To rank high on the Search Engine Results Pages (SERPs), you’ll need to be intentional and strategic about your website’s search engine optimization.
Note: I’ll be using the term “Google” but the lessons apply to all important search engines. Nobody “bings” something when they are stuck!
WordPress has some amazing SEO capabilities built into the software. It becomes MORE powerful by installing a sophisticated, smart plugin called Yoast SEO Plugin.
The Yoast plugin is doing many things behind the scene, here I’ll concentrate on explaining what you can see and can easily effect.
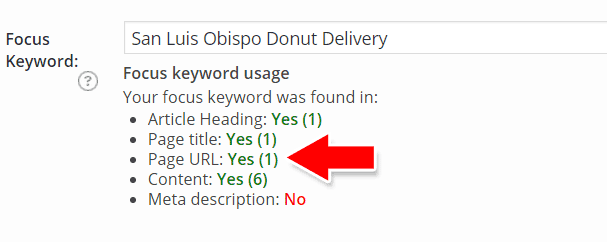
After the plugin is installed, you’ll have a new area on all of your pages and blog posts, with SEO related information about the article. After you write your post (or during), check in the new Yoast area to confirm you have ALL GREEN numbers alongside each SEO factor they check.
In the example above, I have chosen to write about “San Luis Obispo Donut Delivery.” I put this keyword string into the textbox next to “Focus Keyword”, and the plugin analyzes the quality of the post, according to the SEO components that are important for each page/post. As you can see, I’m doing good with all the factors, except “meta description”.
Although not shown in the screenshot, the meta description text area is just below the focus keyword section. To fix my issue, I would type a meaningful meta description that includes my keyword string.
Permalinks
Permalinks determine what the page URLs will be. You need to change the Permalink structure to have URLs that will perform better. The title of your page/post can be in your URL, which helps to inform Google what your page is about.
Consider the following two options:
https://www.sdmllc.com/?p=4125
https://www.sdmllc.com/business/san–luis–obispo–donut–delivery/
Which one do you believe communicates the contents of the article better?
To change the URL structure, log in to your WordPress admin dashboard, then go to Settings > Permalinks. Choose one of the following:
- Day and Name
- Month and Name
- Post Name
WordPress will give you samples URLs based on the option you select. Choose the one that works best for you. Personally, I use prefer “Post Name.”
If you desire to make this change AFTER you have your website up and running AND you have several posts active, you’ll need to take a few extra steps to forward any external links that may be linking to your posts. I would advise you to seek help, so you can properly setup 301 redirects, or else you will be faced with long-term problems.
10) Optimize Your Website
Ok, I admit, this section could go right along with section 5, Improving Your Page Speed. Think of this section as part 2.
Install A Caching Plugin
Caching enables users to open your web pages faster and more efficiently. With a website system such as WordPress, a page is compiled by accessing the database, rending the page combining scripts and files, all of which takes time and a server’s processing power. By rendering a page, as if it were a static file, rather than using a server’s processing load, it is capable of serving the page many times faster.
A good caching plugin does several things:
- Renders a page = fewer pings to the database
- Reducing the total page size
- Reduces page load time
- Improves server performance
- Incorporates a CDN (see below)
The two most popular caching plugins for WordPress are W3 Total Cache and WP Super Cache. These plugins are both recommended by WordPress. To eliminate any possible confusion, you only need to install and use one plugin, not both.
Use A CDN
A content delivery network places the files of your website on servers across the globe, so visitors from any geographic location will be served your website quickly and efficiently.
Visitors experience some amount of latency, or delay, while waiting for your website to load. The greater the distance from your server, typically, the greater the latency. By placing your files on a network of servers, and providing them the closest server to access (without them knowing of course), you improve their experience.
Incorporating a CDN is not necessarily needed by all websites. Especially websites that represent local businesses, whose visitors are typically nearby. Additionally, websites that are small and quick already, will likely have little benefit incorporating a CDN.
Here is a list of the most popular, well known CDNs.
- Cloudflare (has free option)
- Fastly
- Amazon CloudFront
- MaxCDN
- Akamai
- Cachefly
Setting up a CDN for your website can be a time consuming task. Plan on dedicating a few hours to fully integrate your website. You can always reach out to the professionals to help you set up a CDN on your website.
11) Use Google’s Free Tools
Google offers dozens of ways to make your online experience better, from their free Gmail service, the cloud file solutions in Drive, AdWords for marketing your business, and on and on.
For managing and maintaining your website, they have a couple of very powerful, free tools I highly recommend you use. They are Google Analytics and Google Webmaster Tools.
Google Analytics
Google Analytics is a free web analytics service offered by Google that tracks and reports website traffic. It is the most widely used analytics service on the web.
You need to create your free Google Analytics account using a gmail account. This process is very easy.
Once you have your Google Analytics account created and configured, you’ll need to “install” Google Analytics on your website. The easiest way to accomplish this is by installing a free plugin called Google Analytics by Yoast.
Install the plugin, and remain logged in to your Google Analytics account. This will make the next step much easier.
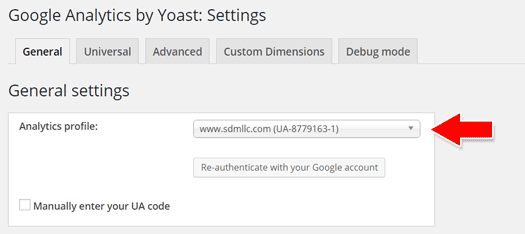
Once the plugin is installed, you need to select your website in the “Analytics profile” dropdown. Go to the Yoast settings screen located at Analytics (left side admin menu) > Settings > General.
For a complete explanation on installing and using this plugin, visit the comprehensive guide created by the Yoast plugin team.
You will now have access to basic analytics inside your WordPress administration dashboard, and you’ll also be able to go directly to the Google Analytics service, to interact with their sophisticated software.
Google Search Console AKA Google Webmaster Tools
Google Webmaster Tools, now being branded as Google Search Console (GSC), offer several benefits to the website owner/manager. Search Console offers several tools and interaction options, designed to help your website be found in their searches, avoid problems and errors, and provide you with additional information about your website traffic.
GSC can and should be linked to your Google Analytics account.
There are numerous guides that will walk you through the steps necessary to setup your GSC account.
One of the most important tasks you can perform, is to ADD your SITEMAP to GSC. If you have installed the Yoast SEO Plugin advised in this guide, than you already have a sitemap created and waiting for you. Check this by going to yourdomain.com/sitemap_index.xml or yourdomain.com/sitemap.xml.
If you have installed the plugin, and do not have a sitemap, go to the Yoast XML Sitemaps settings page, by going to SEO > XML Sitemaps. Make sure the box is checked: [ ] Check this box to enable XML Sitemap functionality.
Back to your Google Search Console…err console. Go to Crawl > Sitemaps. Click on the red button at the top right “ADD/TEST SITEMAP”. Provide Google with the URL of your sitemap and click either “Test Sitemap” or “Submit Sitemap” to verify or add your sitemap. Google will use this sitemap to locate all of the pages on your website and cache your pages in their search.
And that’s it for now! I hope you found this guide incredibly useful and helpful.
If you got lost along the way or would like some help with any of these tips, be sure to give us a call. Often we can perform many of these tasks with our Website Optimization package price of $285. Some websites excluded, based on size, complexity or difficulty.
Thanks for reading, I look forward to reading your comments below!

Daniel is the founding CEO of SDM, created in 1999.
Meet Daniel Van Bogelen, a seasoned entrepreneur with a passion for marketing, business, and website design. With 12 years of marriage and four children, Daniel brings a wealth of personal and professional experience to the table. As a blogger, she is dedicated to helping business owners become more successful, knowledgeable, and confident through his insightful and engaging articles.
Daniel’s journey into entrepreneurship began with a desire to help others achieve their goals. Over the years, he has honed his skills and knowledge through practical experience, rigorous research, and staying up to date with the latest trends and best practices in his industry. As a result, he has become a trusted source of information for business owners who want to take their ventures to the next level.
In his articles, Daniel covers a wide range of topics related to marketing, business, and website design. From SEO tips and social media strategies to effective branding and customer engagement, he shares valuable insights and practical advice that business owners can put into practice right away. By demystifying complex concepts and breaking them down into actionable steps, Daniel helps his readers gain the knowledge and confidence they need to succeed.
What sets Daniel apart from other bloggers in his field is his deep commitment to his readers’ success. He not only shares his expertise but also takes the time to engage with his audience and build meaningful relationships with them. By listening to their feedback and responding to their questions, he creates a sense of community and support that is rare in today’s digital landscape. For business owners who want to stay ahead of the curve and achieve their goals, Daniel’s articles are a must-read.

